Posts

Showing posts from April, 2023

How to use a function in PowerShell

Image
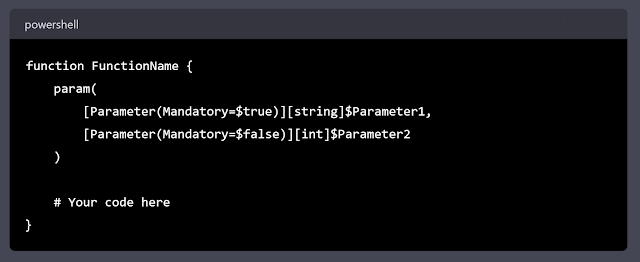
 PowerShell is a powerful scripting language and automation framework developed by Microsoft. It enables IT professionals and developers to automate tasks, manage systems, and access data more efficiently. Functions are an integral part of PowerShell, as they allow you to create reusable code blocks to perform specific tasks. I will go over how to write a function in PowerShell, covering the basic structure, best practices, and examples to help you get started. Basic Structure of a PowerShell Function A PowerShell function is a named block of code that can be reused in scripts or executed as a standalone command. Here's the basic structure of a PowerShell function: A function starts with the function keyword, followed by the function name, and a code block enclosed in curly braces {}. The param block is optional and defines the input parameters for the function. You can specify the data type, default values, and whether the parameter is mandatory or not. Function Naming Conventions

How to use a PowerShell try catch statement

Image
In PowerShell, error handling is crucial for creating robust and error-resistant scripts. One of the most effective error-handling techniques is using try-catch statements. In this blog post, we'll explore the basics of try-catch statements and how to use them in real-world scenarios. What is a Try-Catch Statement? In PowerShell, a try-catch statement is an error-handling mechanism that allows you to execute a block of code (the "try" block) and, in case an error occurs, execute another block of code (the "catch" block) to handle the error. This way, you can control the script's flow and respond to errors accordingly. Basic Syntax: try { # Code that might throw an error } catch { # Code to handle the error } Example 1: Reading a File In this example, we'll try to read the content of a file. If the file does not exist, an error will be thrown, and we'll catch it to display a custom error message. try { $content = Get-Content -Pat

How to setup and configure CMG in SCCM

Image
 Microsoft System Center Configuration Manager (SCCM), also known as Endpoint Configuration Manager, is a comprehensive solution that helps organizations manage their devices and applications. With the Cloud Management Gateway (CMG), you can extend the capabilities of SCCM to manage your devices over the internet. This blog post will guide you through setting up and configuring the Cloud Management Gateway for SCCM. Prerequisites Before diving into the setup process, ensure that you have the following in place: A Microsoft Azure subscription. An SCCM hierarchy with at least one primary site. The SCCM version should be 1806 or later. A PKI infrastructure for HTTPS communication (optional, but recommended). Step-by-Step Guide to Setting up and Configuring Cloud Management Gateway for SCCM Step 1: Create a Cloud Management Gateway in the Azure Portal Sign in to the Azure portal (https://portal.azure.com). Click on "Create a resource" and search for "Cloud Management Gateway

How to enable Windows Server Data Deduplication

Image
SCCM can take a lot of space having to store drivers, wim images and various software. A great way to reduce the amount of space that those items are taking up and stretch your disk space to last longer is to enable Windows Server's built-in file deduplication. Starting in Windows Server 2012 Microsoft released a feature called data deduplication . The built-in data deduplication works on the bit level so files don't need to be exactly the same for the deduplication to work, they only need to be alike down to the bit.  Step 1: Check for File Deduplication Support Before you start, make sure your Windows Server supports file deduplication. This feature is only available on Windows Server 2012 and newer versions. Step 2: Install File Server Role If you haven't already, you'll need to install the File Server role on your Windows Server. This can be done using the Server Manager. Step 3: Install Data Deduplication Feature Next, you need to install the Data Deduplication fea

PowerCopy 4.0.0

Image
 Just recently I released the newest version of PowerCopy. This is the first complete redo of the application fixing various bugs, adding new features,s and optimizing the application.  Changes  Fixed an issue that wouldn't allow for multiple exclusions  Fixed a bug that would stop all instances of robocopy when you click the stop button in PowerCopy  Added a feature to change how PowerCopy will over wite files and folders that are already present in the destination  Added a progress bar for the overall progress of the job and a progress bar that shows the status of the current object that is being copied  Added an option to use backup mode so files in use can be copied  Simplified the output box to show what is being copied  PowerCopy can be downloaded from the main PowerCopy Page