WinPE x64 - Custom Rescue Image
The other day I needed to log into a VM I built ages ago but I forgot the password. I though to my self ok, no problem I will pop in my copy of NT password reset form pogostick.net, only problem was it would never load I have had this problem in the past either I would forget to do a step in the setup process or the system was not configured correctly to boot the OS. Instead of trying to trouble shoot my steps I decided to try to look for a tool that I could include in WinPE. I figured I know WinPE way better and this way I can include other tools like PowerShell. After a little while I finally found a tool called ntpwed it works in the same way as NT Password Reset only problem is it is very difficult to find the download for it the original site http://cdslow.webhost.ru where the tool seemed to be from is down. I finally tracked down a copy and made sure it was legitimate and not some virus. .I built the PE image added some other tools I like to use and packed it all up in a ISO to burn to a CD or USB drive.
What's all included

What's all included
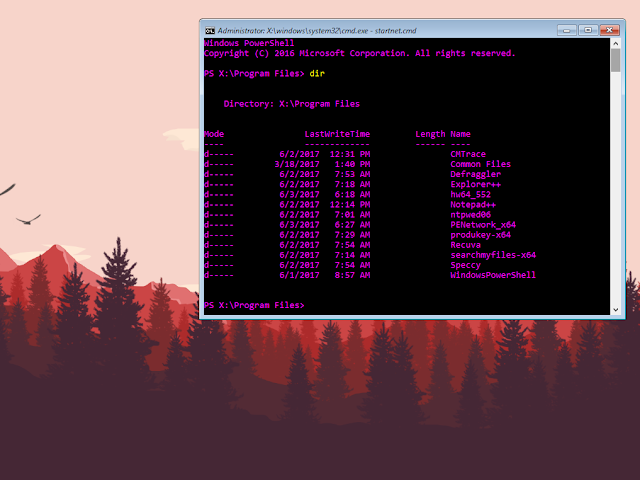
- PowerShell - Microsoft PowerShell
- Cmtrace - Log view application
- Defraggler - A defragging tool
- Explorer++ - File explorer
- Notepad++ - Advanced text editor
- ntpwedit - Windows password reset tool
- PENetwork - Ntwork configuration tool
- Produkey - Product key finder
- Recuva - File recovery tool
- SearchMyFiles - Advanced file search tool
- Speccy - System info tool
1. To Create your own version of my Win PE Image you will first need to download Windows ADK .
Because of some issue with with version 1703 I used version 1607 but it shouldn't make much of a difference on the version you are using. The download the source zip file with all of my configurations from HERE
2. Install the ADK using the default settings
3. Once the ADK has been installed you will open Deployment and Imaging Tools Environment which should be located under the Windows Kits folder on your start menu.
4. Next copy and paste the following, This command will create the Windows PE Directory that you can work from
5. Now you will mount the Image file so you can edit it
6. Add PowerShell to the Image
7. Navigate to C:\WinPE\mount\Windows\System32 take ownership of startnet.cmd and add grant your user account full control to the file. Then delete startnet.cmd and copy the startnet.cmd file from my SourceFiles. This is the file the controls the startup process if there is any command you want to run at the startup of WinPE you can put that command in this file.
8. Navigate to C:\WinPE\mount\System32 and take ownership ship of the winpe.jpg file and grant your own account full control. This is the background file if you want your own background just replace winpe.jpg with your file (you need to rename your file winpe.jpg). I have my own in the SourceFiles if you wish to use mine.
9. Take ownership of C:\WinPE\mount\Program Files and grant your account full control to the folder. Copy all zip and 7z files from my SourceFiles to C:\WinPE\mount\Program Files. Now decompress each file keeping the name the same as the zip file for example CMTrace-x64.zip should be decompressed to C:\WinPE\mount\Program Files\CMTrace-x64.
10. Copy the LaunchFiles Folder and copy it to C:\WinPE\Mount\System32
11. Run regedit as administrator and open HKEY_Local_Machine and click file from the file menu choose Load Hive. Browse to C:\WinPE\mount\System32\Config and open the SYSTEM file. Name the new hive WIN_PE. In regedit Navigate to HKLM\WIN_PE\ControlSet001\Control\Session Manager\Environment. Double-Click path and add the folowing to the Value data ;%SystemRoot%\System32\LaunchFiles click ok and click on HKEY_LOCAL_MACHINE click file then Unload Hive.
12. Dismount the Image and save your work by running:
If you get a error when dismounting the Image navigate to C:\WinPE\mount and delete any folder left then run:
13. To create a ISO file run:
14. You can burn your new WinPE Rescue Image to a USB drive using my ISOtoUSB tool or burn it to a CD. Your new Image is small and very powerful.
Because of some issue with with version 1703 I used version 1607 but it shouldn't make much of a difference on the version you are using. The download the source zip file with all of my configurations from HERE
2. Install the ADK using the default settings
3. Once the ADK has been installed you will open Deployment and Imaging Tools Environment which should be located under the Windows Kits folder on your start menu.
4. Next copy and paste the following, This command will create the Windows PE Directory that you can work from
copype amd64 C:\WinPE
5. Now you will mount the Image file so you can edit it
Dism /Mount-Image /ImageFile:"C:\WinPE\media\sources\boot.wim" /index:1 /MountDir:"C:\WinPE\mount"
6. Add PowerShell to the Image
Dism /Add-Package /Image:"C:\WinPE\mount" /PackagePath:"C:\Program Files (x86)\Windows Kits\10\Assessment and Deployment Kit\Windows Preinstallation Environment\amd64\WinPE_OCs\WinPE-WMI.cab"

Dism /Add-Package /Image:"C:\WinPE\mount" /PackagePath:"C:\Program Files (x86)\Windows Kits\10\Assessment and Deployment Kit\Windows Preinstallation Environment\amd64\WinPE_OCs\en-us\WinPE-WMI_en-us.cab"

Dism /Add-Package /Image:"C:\WinPE\mount" /PackagePath:"C:\Program Files (x86)\Windows Kits\10\Assessment and Deployment Kit\Windows Preinstallation Environment\amd64\WinPE_OCs\WinPE-NetFX.cab"

Dism /Add-Package /Image:"C:\WinPE\mount" /PackagePath:"C:\Program Files (x86)\Windows Kits\10\Assessment and Deployment Kit\Windows Preinstallation Environment\amd64\WinPE_OCs\en-us\WinPE-NetFX_en-us.cab"

Dism /Add-Package /Image:"C:\WinPE\mount" /PackagePath:"C:\Program Files (x86)\Windows Kits\10\Assessment and Deployment Kit\Windows Preinstallation Environment\amd64\WinPE_OCs\WinPE-Scripting.cab"

Dism /Add-Package /Image:"C:\WinPE\mount" /PackagePath:"C:\Program Files (x86)\Windows Kits\10\Assessment and Deployment Kit\Windows Preinstallation Environment\amd64\WinPE_OCs\en-us\WinPE-Scripting_en-us.cab"

Dism /Add-Package /Image:"C:\WinPE\mount" /PackagePath:"C:\Program Files (x86)\Windows Kits\10\Assessment and Deployment Kit\Windows Preinstallation Environment\amd64\WinPE_OCs\WinPE-PowerShell.cab"

Dism /Add-Package /Image:"C:\WinPE\mount" /PackagePath:"C:\Program Files (x86)\Windows Kits\10\Assessment and Deployment Kit\Windows Preinstallation Environment\amd64\WinPE_OCs\en-us\WinPE-PowerShell_en-us.cab"

Dism /Add-Package /Image:"C:\WinPE\mount" /PackagePath:"C:\Program Files (x86)\Windows Kits\10\Assessment and Deployment Kit\Windows Preinstallation Environment\amd64\WinPE_OCs\WinPE-StorageWMI.cab"

Dism /Add-Package /Image:"C:\WinPE\mount" /PackagePath:"C:\Program Files (x86)\Windows Kits\10\Assessment and Deployment Kit\Windows Preinstallation Environment\amd64\WinPE_OCs\en-us\WinPE-StorageWMI_en-us.cab"

Dism /Add-Package /Image:"C:\WinPE\mount" /PackagePath:"C:\Program Files (x86)\Windows Kits\10\Assessment and Deployment Kit\Windows Preinstallation Environment\amd64\WinPE_OCs\WinPE-DismCmdlets.cab"

Dism /Add-Package /Image:"C:\WinPE\mount" /PackagePath:"C:\Program Files (x86)\Windows Kits\10\Assessment and Deployment Kit\Windows Preinstallation Environment\amd64\WinPE_OCs\en-us\WinPE-DismCmdlets_en-us.cab"
7. Navigate to C:\WinPE\mount\Windows\System32 take ownership of startnet.cmd and add grant your user account full control to the file. Then delete startnet.cmd and copy the startnet.cmd file from my SourceFiles. This is the file the controls the startup process if there is any command you want to run at the startup of WinPE you can put that command in this file.
8. Navigate to C:\WinPE\mount\System32 and take ownership ship of the winpe.jpg file and grant your own account full control. This is the background file if you want your own background just replace winpe.jpg with your file (you need to rename your file winpe.jpg). I have my own in the SourceFiles if you wish to use mine.
9. Take ownership of C:\WinPE\mount\Program Files and grant your account full control to the folder. Copy all zip and 7z files from my SourceFiles to C:\WinPE\mount\Program Files. Now decompress each file keeping the name the same as the zip file for example CMTrace-x64.zip should be decompressed to C:\WinPE\mount\Program Files\CMTrace-x64.
10. Copy the LaunchFiles Folder and copy it to C:\WinPE\Mount\System32
11. Run regedit as administrator and open HKEY_Local_Machine and click file from the file menu choose Load Hive. Browse to C:\WinPE\mount\System32\Config and open the SYSTEM file. Name the new hive WIN_PE. In regedit Navigate to HKLM\WIN_PE\ControlSet001\Control\Session Manager\Environment. Double-Click path and add the folowing to the Value data ;%SystemRoot%\System32\LaunchFiles click ok and click on HKEY_LOCAL_MACHINE click file then Unload Hive.
12. Dismount the Image and save your work by running:
Dism /Unmount-Image /MountDir:"C:\WinPE\mount" /commit
Dism /Unmount-Image /MountDir:"C:\WinPE\mount" /discard
13. To create a ISO file run:
MakeWinPEMedia /ISO C:\WinPE C:\WinPE\WinPE_Recovery.iso
14. You can burn your new WinPE Rescue Image to a USB drive using my ISOtoUSB tool or burn it to a CD. Your new Image is small and very powerful.
