SCCM Task Sequence with GUI - How to install more then one image with a single Task Sequence
Update to the process
A few weeks ago, I put out a guide on how to create a Task Sequence for windows 10. This post will build off of that that and will show you how to build a TS that will display a GUI that will allow your technicians to set the computer name, enter a description to be updated to AD, choose what operating system image to install and choose from a list of applications to install.

The first thing you will need to do is download a copy the TS example files, you can get them from HERE. In the zip files, you should have a few folders InstallUpdates, SetADDescription, TSGUI_x64 and Windows10Config copy each of the folders where you keep your SCCM content files.
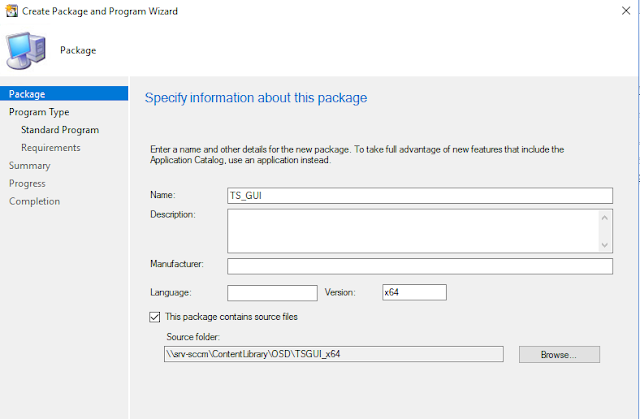
1. Create a package for the GUI, give the package a name like TS_GUI, for the version type x64, check the box "This package contains source files" and brose for the TSGUI_x64 folder.
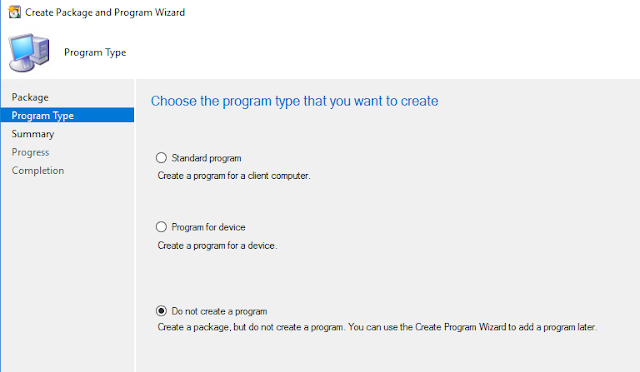
2. Click next and change the radial to "Do not create a program" click next until the package is complete. Next, distribute the package to your distribution point
3. Create a package for setting the description in AD, name the package Set AD Description, check the box "This package contains source files" and brows to the SetADDescription folder. Click next and change the radial to "Do not create a program" complete the package and distribute it to your DP.
4. Create a package for the Windows 10 configuration process. Name the package Windows 10 Config. Check the box "This package contains source files" brows for the Windows10Config folder. Click next and change the radial to "Do not create a program". Complete the package and distribute it to your DP.
5. OPTIONAL: If you need to install windows update files (MSU files) as a part of your TS then you will create a package for windows 10 and windows 7 separately.
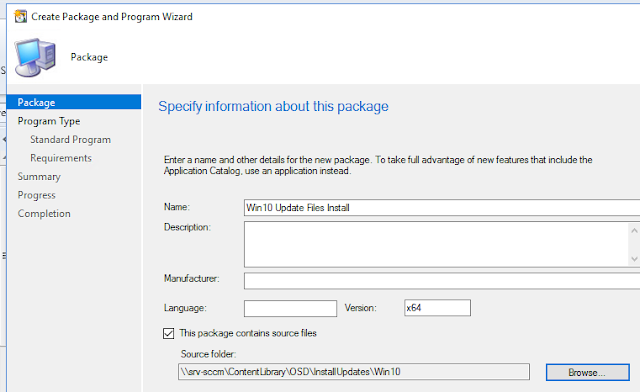
A. Create a package name it Win10 Update Files Install. Add x64 as the version for the package check the box "This package contains source files" and browse to the Win10 folder in the InstallUpdates folder. Click next and change the radial to "Do not create a program". Complete the package and distribute it
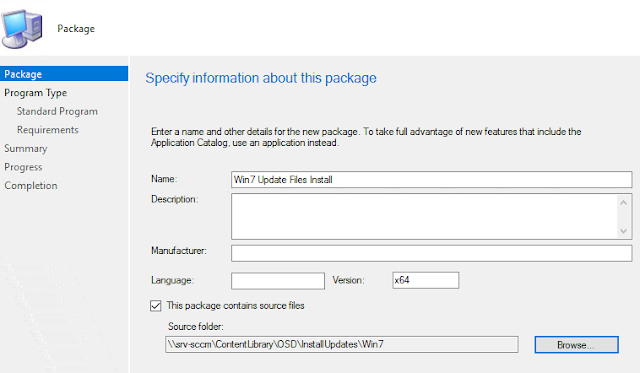
B. Do the same for the package for Win7 Update Files Install but point the source to the Win7 folder.
6. One last thing before you can start building the TS, you need to create a custom Boot Image for the TS. I normally make a copy of the default boot image. You can do this by opening the properties of the default boot image and navigating to the Data Source Tab.
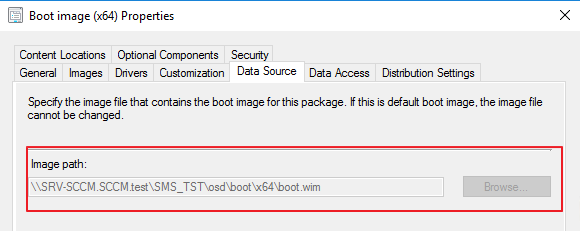
7. Navigate to the path listed and copy the wim file to a new location (be sure to make the path descriptive enough that you can identify what the wim is used for.
8. Next, right click on Boot Images and click Add Boot Image. Browse for the wim file you copied. Give it a good descriptive name like UniversalTSx64 click next and wait for the import process to complete (it can take some time).
9. Right click on your new boot image, click properties and change to Optional Components tab. In the Optional Components tab, click the button for a new component.
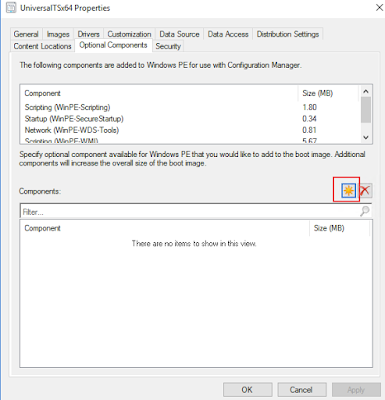
10. You need to add the Windows PowerShell (WinPE-DismCmdlets), HTML (WinPE-HTA), Microsoft .NET (WinPE-NetFx), and Windows PowerShell (WinPE-PowerShell) components. Apply your changes and distribute the Boot Image.

11. Next, Create a Task Sequence and choose create a new custom task sequence, Name it Universal Task Sequence x64, for the boot image browse for your custom Boot Image.
12. Once the TS is created click edit.
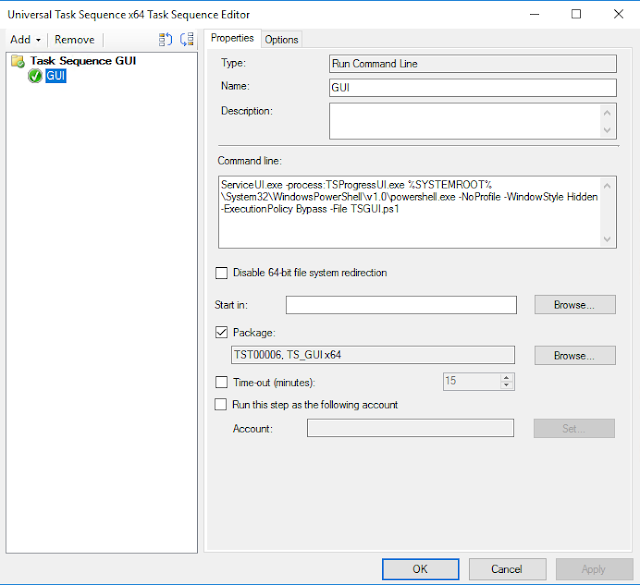
13. Create a New Group called Task Sequence GUI and in that group add a run Command line task. Name the task GUI and use the blow for the command line:
ServiceUI.exe -process:TSProgressUI.exe %SYSTEMROOT%\System32\WindowsPowerShell\v1.0\powershell.exe -NoProfile -WindowStyle Hidden -ExecutionPolicy Bypass -File TSGUI.ps1
14. Check the package Box and browse for the TS_GUIx64, click apply
This task will start the GUI, for this task to run the Disk must be able to be written to if this step fails try doing the following:
while still booted to the TS press F8 this will launch a command line
type:
15. Create a group named Install OS
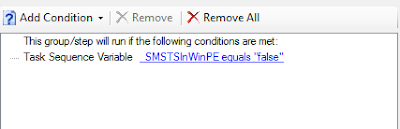
16. Add a Restart Task, go to the options tab and add a task sequence variable.
Variable: _SMSTSInWinPE
Condition: equals
Value: false 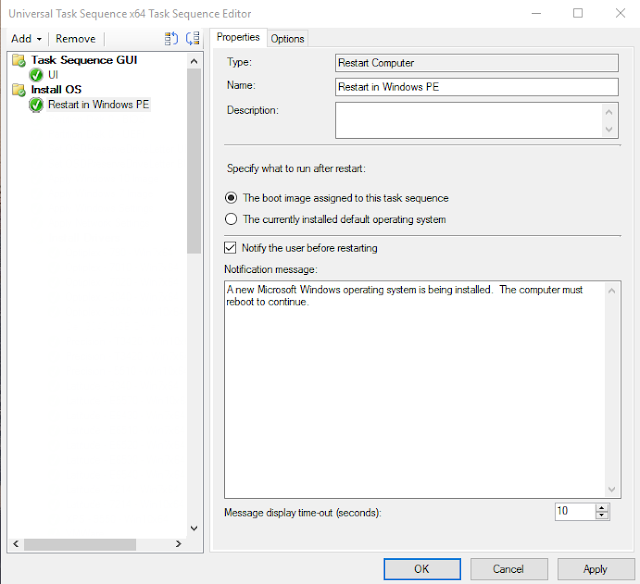
17. Next, you will add a Format and Partition Disk task for BIOS and UEFI if you are only going to use UEFI or BIOS then you can just create a single task for the one you need
A. Settings for BIOS setup
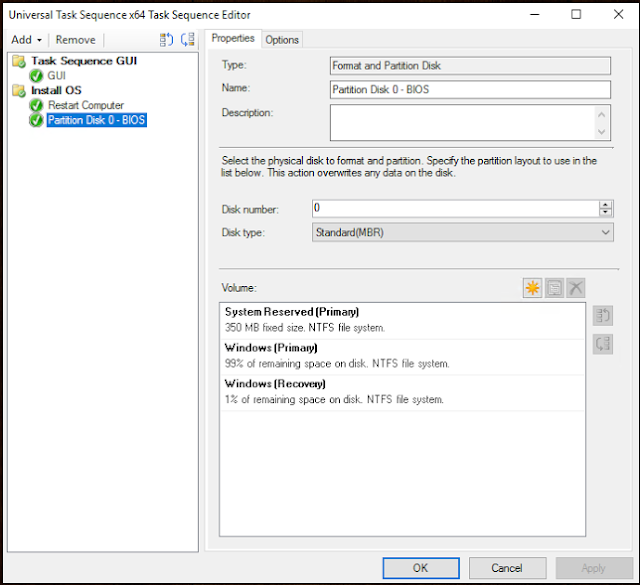
Name the task Partition Disk 0 - BIOS
Create a Volume named System Reserved
Partition type: Primary
Use specific size 350 MB
Check "Make this the boot partition
Check "Do not assign a drive letter to this partition
File system: NTFS quick format 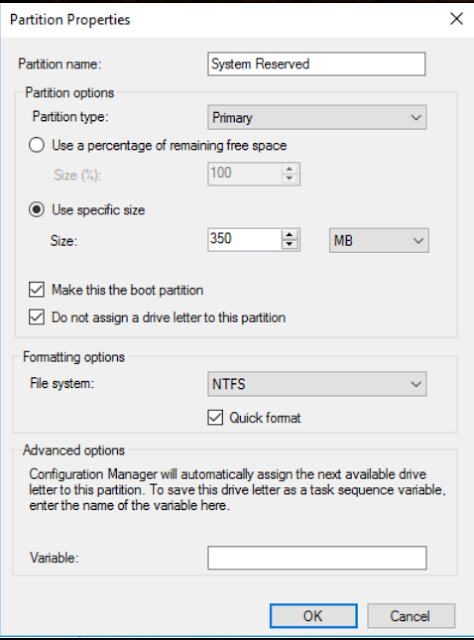
Create a Volume named Windows
Partition type: Primary
Use a percentage of remaining free space 99%
Variable: OSDrive 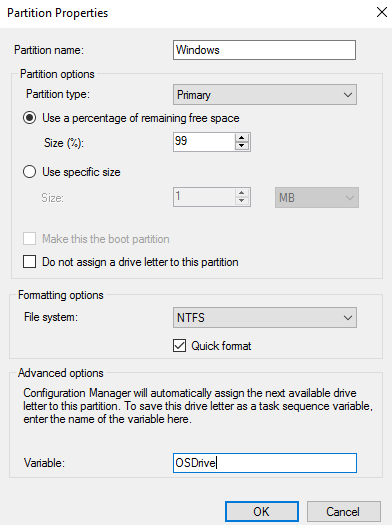
Create a Volume named Windows
Partition Type: Recovery
Use a percentage of remaining free space 1% 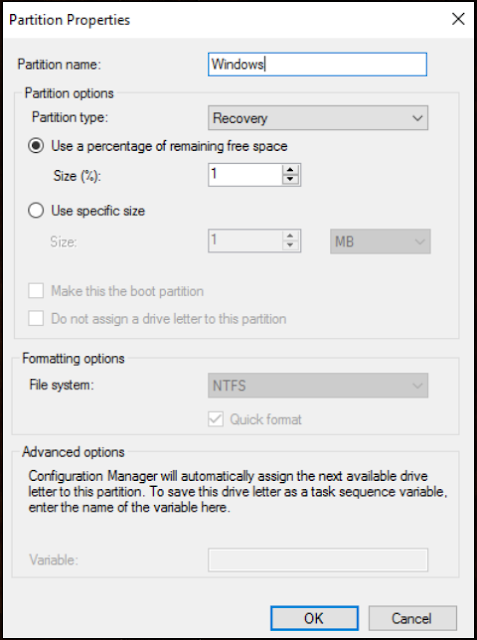
Once you have all the partitions created you will need to add the following options
Variable: _SMSTSBootUEFI
Condition: not equals
Value: true 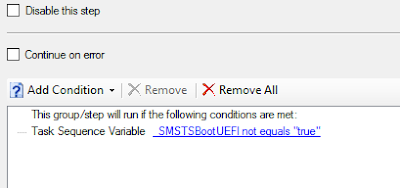
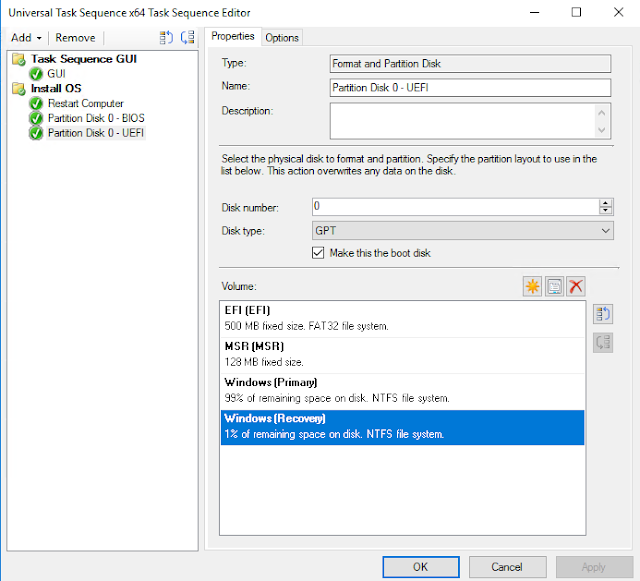
B. Partition Disk 0 - UEFI settings
Name the task Partition Disk 0 - UEFI
Change the Disk type to GPT and Check "Make this the boot disk"
Create a partition named EFI
Partition type: EFI
Use specific size 500 MB 
Create a partition named MSR
Partition type: MSR
Use specific size 128 MB 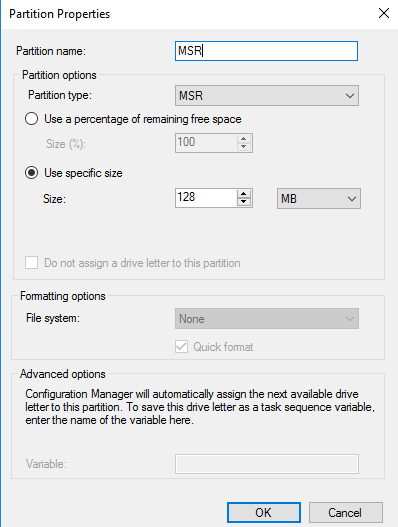
Create a partition named Windows
Partition type: Primary
Use a percentage of remaining free space 99%
File system: NTFS quick format
Variable: OSDrive 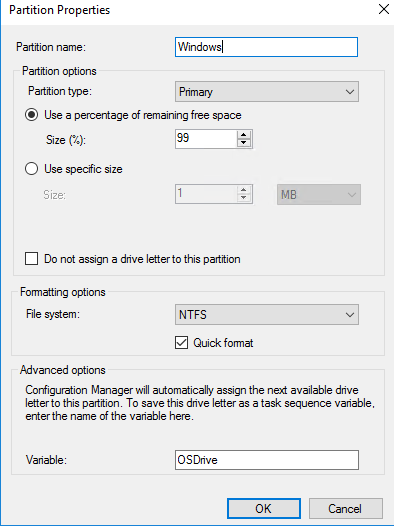
Create a partition named Windows
Partition type: Recovery
Use a percentage of remaining free space 1% 
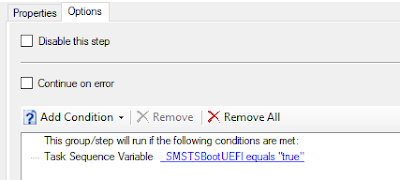
Add the following options to the task
Variable: _SMSTSBootUEFI
Condition: equals
Value: true
18. Sometimes, the windows 7 install media when booted from BIOS and not UEFI will not assigned the correct drive letter to the OS partition and so your partition will not be C as it should be. To fix this you can create a task that will tell the TS not to hold the drive letter assigned by the image file. Add a set task sequence variable task with the following settings
Task Name: Set OSDPreserveDriveLetter BIOS
Task Sequence Variable: OSDPreserveDriveLetter
Value: false

19. You then need to add options to the OSDPeserveDriveLetter BIOS task so it is only applied when the computer is booted via BIOS. To that add the following variable to the options.
Variable: _SMSTSBootUEFI
Condition: equals
Value: false

20. Next you will create a task to apply your operating system image. In your own environment you will create a task for each image you want to use. for this example I will be using a windows 10 and windows 7 image. Create a task named Windows 10, browse for the windows 10 image file you have imported into SCCM. Change the Destination to Logical drive letter stored in a variable and the variable name OSDrive
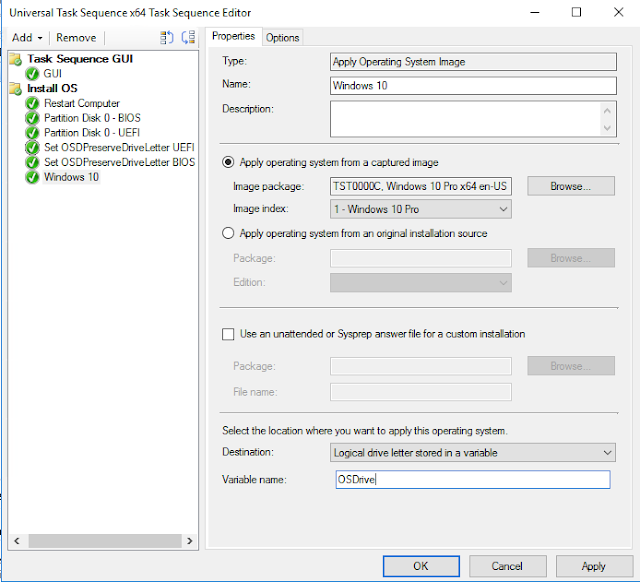
21. Add a task sequence variable condition under the Options tab of the Windows 10 task.
Variable: OSType
Condition: equals
Value: Windows10


22. Now do the same as step 20 for a windows 7 image
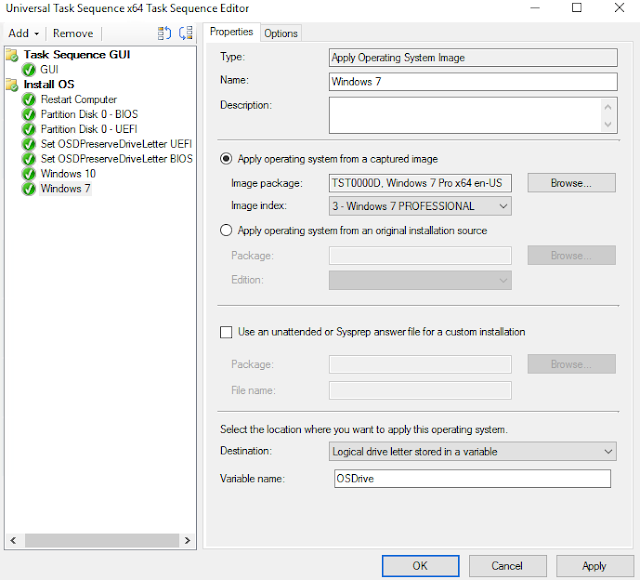
23. Add a task sequence variable condition under the Options tab of the Windows 7 task.

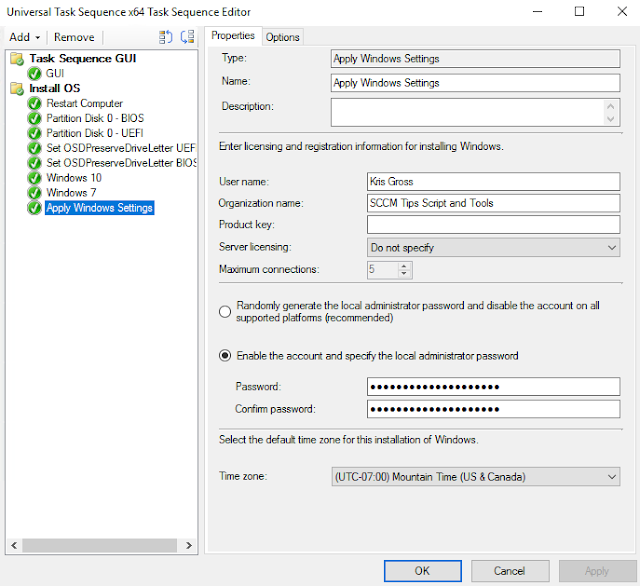
24. Next you will create a Apply Windows Settings task. This step applies owner, local administrator and time zone information.
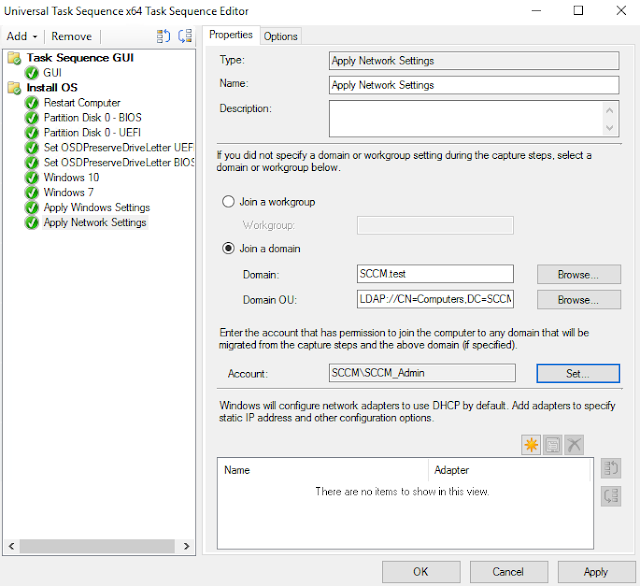
25. Add an Apply network settings task again these settings will vary based on you organizations settings.
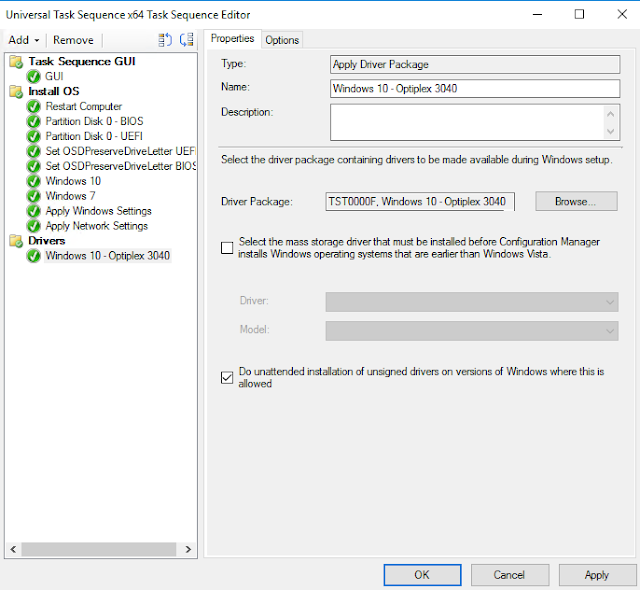
26. Next you will be adding a group called Drivers to the TS, Here you will configure how your driver packs will be applied. In my Windows 10 TS post I talked about how you can install drivers based on compatibility or install a single package based on some TS variables. Generally the compatibility option works but in the case of some dell drivers that method will not work correctly. To help resolve this and to be sure you are getting the correct drivers based on the OS and computer model you will create a Apply drivers Package task, name the task something to corresponds with what driver pack it will install. Check “Do unattended installation of unsigned drivers on versions of Windows where this is allowed”.
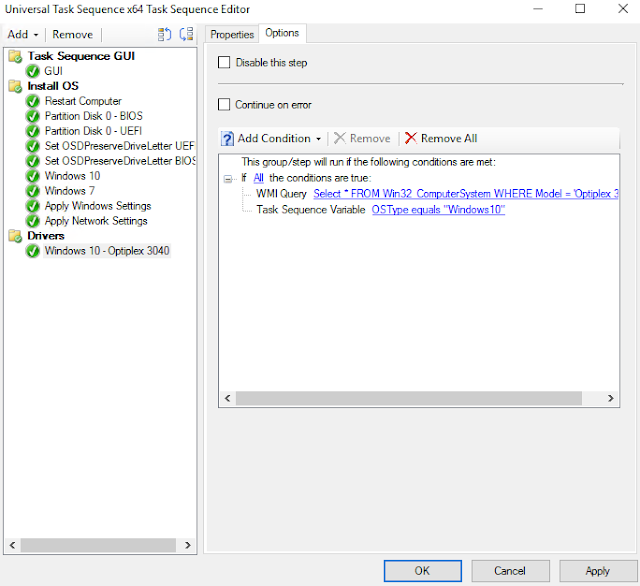
27. Now you need to add some task sequence variables to the Options tab of your driver pack install task. First add a if statement condition and choose if all conditions. Next add a WMI Query Properties
WMI Namespace: root\cimv2
WQL Query: Select * FROM Win32_ComputerSystem WHERE Model = 'Optiplex 3040' “WHERE Model =” should be the model of the computer you want the driver package to install on. If you need to get this exact information you can run the following PowerShell command on the computer in question
(get-wmiobject win32_ComputerSystem).Model
Now add a Task Sequence Variable
Variable: OSType
Condition: equals
Value: Windows10 By using these settings the task will run a WMI query on the system to verify the computer model matches what you told it to look for and verify the OS matches what you set in the GUI.
28. Do the same for all driver packs you need to install as apart of your TS.
29. Create a group named Setup Operating System
30. In the Setup Operating System group add a Setup Windows and ConfigMgr. For the Client package choose your SCCM client install package. you may want to add some Installation properties like increasing the SCCM cache size. Here is what I use
CCMLOGLEVEL=0 CCMLOGMAXSIZE=16000000 CCMLOGMAXHISTORY=1 CCMDEBUGLOGGING=0 SMSCACHSIZE=25600
You can view what these do and other properties that can be added from here
https://technet.microsoft.com/en-us/library/gg699356.aspx
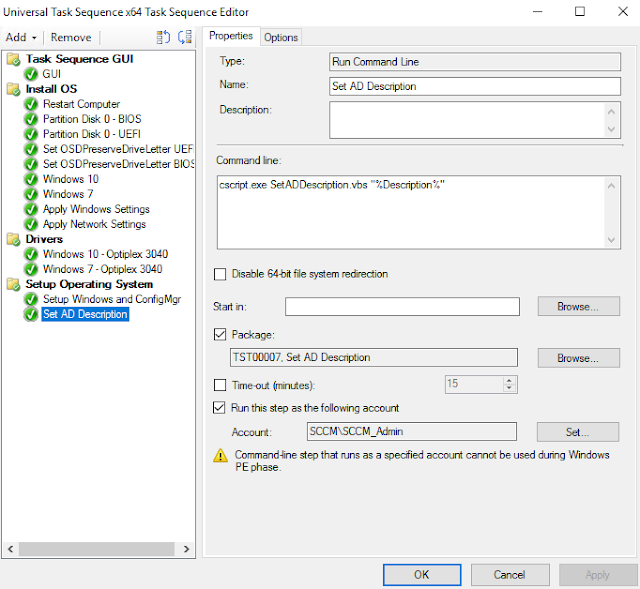
31. The next step in the Setup Operating System group is to run the script that will add the computer description to AD. Stat by adding a run command line task to the TS. Give it a name like Add AD Description. then use the following as the command line.
cscript.exe SetADDescription.vbs "%Description%"
check the "Package" box and browse for the Set AD Description package. You must set an account to run this task as, the account must have right to modify objects in AD
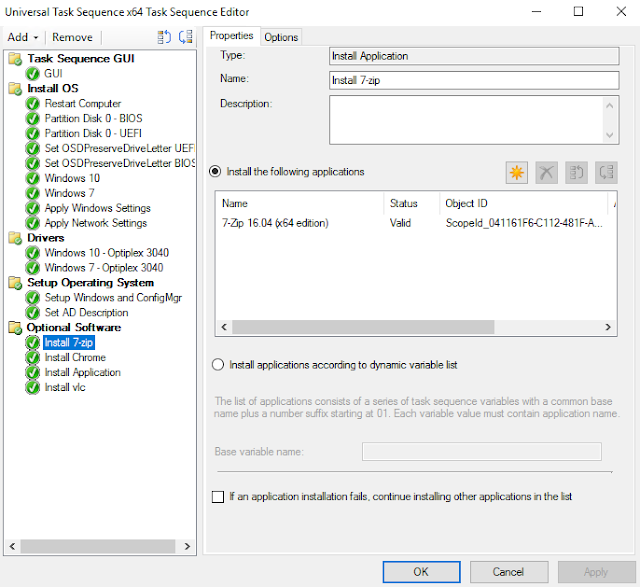
32. Now you will create a group called Optional Software, this group will hold all the entries for the software options you want in your GUI. For is example I am going to use Firefox, Chrome, 7-zip and VLC. These options should correspond with the software selection list in the GUI. These options are controlled in the below lines of code in the TSGUI.ps1 script.

33. Create a Install Application task even though you can add multiple applications in the task do not do this because each task will run based on the variables set by the GUI. Once you have added the application for the task add the following Options to the task. The variable corresponds with the TSVariable column of the OptionalSoftware variable in the TSGUI.ps1 script.
Task Sequence Variable
Variable: 7zip
Condition: equals
Value: true 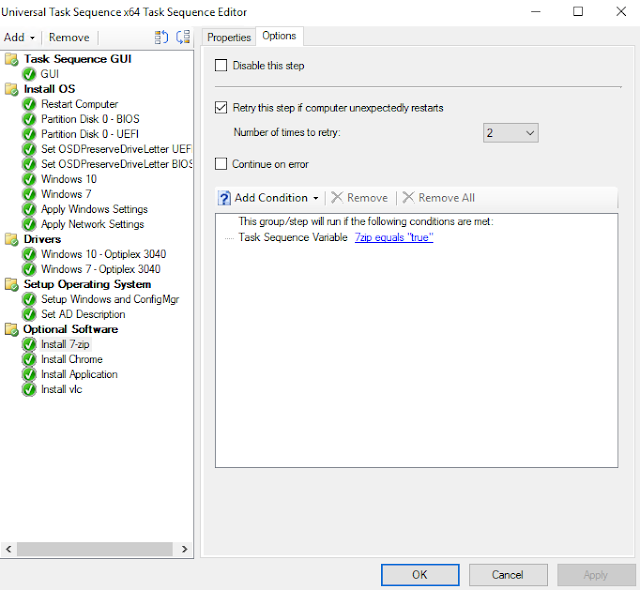
34. Do this for the rest of the applications you need to have advertised in your GUI. Depending on your software you may want to add a reboot task at the end of this group.
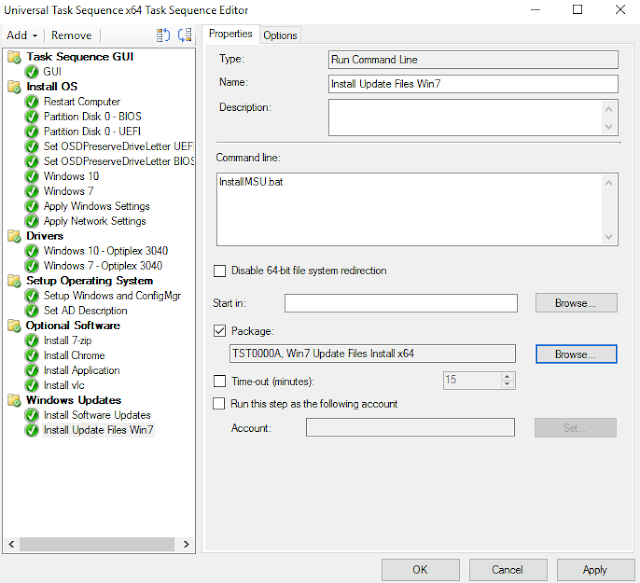
35. Create a group for windows updates, in this group you will add a task to install updates from your server and install any addition update files you need to apply to your image. For the install Software Updates task I leave the settings at there defaults.
Once you have this task completes you will add a run command line task. Name the task Install Update Files Win7 and use the following for the command line
installMSU.bat
in the example files I have included

Do the same for a step for windows 10 and add a restart task right after the windows 10 step

36. Create a Post Config Group
37. Windows 10 has a lot of addition software that you may not want on your users workstations and IE is some what hidden from a standard user. You can fix some of these issues in your gold image file but I like to keep the image file as untouched as possible. So that is where the Win10Config.ps1 script comes in. This script will remove some of the built in apps based on what is in the AppsToRemove.txt file then will apply a temporary stat menu layout for all new users that log into the workstation. Below is what the Config that comes with the script will look like.

if you want to build your own start menu Config you can make all your changes to the start menu then run the below powershell command.
export-startlayout –path
To make this script run you need to add a run command line task to the Post Config group and use the following as the command line
%SYSTEMROOT%\System32\WindowsPowerShell\v1.0\powershell.exe -NoProfile -WindowStyle Hidden -ExecutionPolicy Bypass -File Win10Config.ps1
check the box for the “Package” and browse for the Windows 10 Config package.
Now add options to the task so it only runs on windows 10

That's it your TS is now complete. If you need a TS for x86 then you can use all the same files but you will want to create a TS GUI package using the files in the TSGUI_x86 folder.
A few weeks ago, I put out a guide on how to create a Task Sequence for windows 10. This post will build off of that that and will show you how to build a TS that will display a GUI that will allow your technicians to set the computer name, enter a description to be updated to AD, choose what operating system image to install and choose from a list of applications to install.

The first thing you will need to do is download a copy the TS example files, you can get them from HERE. In the zip files, you should have a few folders InstallUpdates, SetADDescription, TSGUI_x64 and Windows10Config copy each of the folders where you keep your SCCM content files.
1. Create a package for the GUI, give the package a name like TS_GUI, for the version type x64, check the box "This package contains source files" and brose for the TSGUI_x64 folder.

2. Click next and change the radial to "Do not create a program" click next until the package is complete. Next, distribute the package to your distribution point
3. Create a package for setting the description in AD, name the package Set AD Description, check the box "This package contains source files" and brows to the SetADDescription folder. Click next and change the radial to "Do not create a program" complete the package and distribute it to your DP.

4. Create a package for the Windows 10 configuration process. Name the package Windows 10 Config. Check the box "This package contains source files" brows for the Windows10Config folder. Click next and change the radial to "Do not create a program". Complete the package and distribute it to your DP.
5. OPTIONAL: If you need to install windows update files (MSU files) as a part of your TS then you will create a package for windows 10 and windows 7 separately.
A. Create a package name it Win10 Update Files Install. Add x64 as the version for the package check the box "This package contains source files" and browse to the Win10 folder in the InstallUpdates folder. Click next and change the radial to "Do not create a program". Complete the package and distribute it
B. Do the same for the package for Win7 Update Files Install but point the source to the Win7 folder.


6. One last thing before you can start building the TS, you need to create a custom Boot Image for the TS. I normally make a copy of the default boot image. You can do this by opening the properties of the default boot image and navigating to the Data Source Tab.

7. Navigate to the path listed and copy the wim file to a new location (be sure to make the path descriptive enough that you can identify what the wim is used for.
8. Next, right click on Boot Images and click Add Boot Image. Browse for the wim file you copied. Give it a good descriptive name like UniversalTSx64 click next and wait for the import process to complete (it can take some time).
9. Right click on your new boot image, click properties and change to Optional Components tab. In the Optional Components tab, click the button for a new component.

10. You need to add the Windows PowerShell (WinPE-DismCmdlets), HTML (WinPE-HTA), Microsoft .NET (WinPE-NetFx), and Windows PowerShell (WinPE-PowerShell) components. Apply your changes and distribute the Boot Image.

11. Next, Create a Task Sequence and choose create a new custom task sequence, Name it Universal Task Sequence x64, for the boot image browse for your custom Boot Image.
12. Once the TS is created click edit.
13. Create a New Group called Task Sequence GUI and in that group add a run Command line task. Name the task GUI and use the blow for the command line:
ServiceUI.exe -process:TSProgressUI.exe %SYSTEMROOT%\System32\WindowsPowerShell\v1.0\powershell.exe -NoProfile -WindowStyle Hidden -ExecutionPolicy Bypass -File TSGUI.ps1
14. Check the package Box and browse for the TS_GUIx64, click apply
This task will start the GUI, for this task to run the Disk must be able to be written to if this step fails try doing the following:
while still booted to the TS press F8 this will launch a command line
type:
- diskpart
- list disk
- select disk <the OS disk generally disk 0>
- clean
- create partition primary
- format fs=ntfs quick
- active
- exit

15. Create a group named Install OS
16. Add a Restart Task, go to the options tab and add a task sequence variable.


17. Next, you will add a Format and Partition Disk task for BIOS and UEFI if you are only going to use UEFI or BIOS then you can just create a single task for the one you need
A. Settings for BIOS setup


Once you have all the partitions created you will need to add the following options

B. Partition Disk 0 - UEFI settings


Add the following options to the task
18. Sometimes, the windows 7 install media when booted from BIOS and not UEFI will not assigned the correct drive letter to the OS partition and so your partition will not be C as it should be. To fix this you can create a task that will tell the TS not to hold the drive letter assigned by the image file. Add a set task sequence variable task with the following settings

19. You then need to add options to the OSDPeserveDriveLetter BIOS task so it is only applied when the computer is booted via BIOS. To that add the following variable to the options.

20. Next you will create a task to apply your operating system image. In your own environment you will create a task for each image you want to use. for this example I will be using a windows 10 and windows 7 image. Create a task named Windows 10, browse for the windows 10 image file you have imported into SCCM. Change the Destination to Logical drive letter stored in a variable and the variable name OSDrive

21. Add a task sequence variable condition under the Options tab of the Windows 10 task.

22. Now do the same as step 20 for a windows 7 image

23. Add a task sequence variable condition under the Options tab of the Windows 7 task.
- Variable: OSType
- Condition: equals
- Value: Windows7

24. Next you will create a Apply Windows Settings task. This step applies owner, local administrator and time zone information.

25. Add an Apply network settings task again these settings will vary based on you organizations settings.

26. Next you will be adding a group called Drivers to the TS, Here you will configure how your driver packs will be applied. In my Windows 10 TS post I talked about how you can install drivers based on compatibility or install a single package based on some TS variables. Generally the compatibility option works but in the case of some dell drivers that method will not work correctly. To help resolve this and to be sure you are getting the correct drivers based on the OS and computer model you will create a Apply drivers Package task, name the task something to corresponds with what driver pack it will install. Check “Do unattended installation of unsigned drivers on versions of Windows where this is allowed”.

27. Now you need to add some task sequence variables to the Options tab of your driver pack install task. First add a if statement condition and choose if all conditions. Next add a WMI Query Properties
(get-wmiobject win32_ComputerSystem).Model
Now add a Task Sequence Variable

28. Do the same for all driver packs you need to install as apart of your TS.
29. Create a group named Setup Operating System
30. In the Setup Operating System group add a Setup Windows and ConfigMgr. For the Client package choose your SCCM client install package. you may want to add some Installation properties like increasing the SCCM cache size. Here is what I use
CCMLOGLEVEL=0 CCMLOGMAXSIZE=16000000 CCMLOGMAXHISTORY=1 CCMDEBUGLOGGING=0 SMSCACHSIZE=25600
You can view what these do and other properties that can be added from here
https://technet.microsoft.com/en-us/library/gg699356.aspx
31. The next step in the Setup Operating System group is to run the script that will add the computer description to AD. Stat by adding a run command line task to the TS. Give it a name like Add AD Description. then use the following as the command line.
cscript.exe SetADDescription.vbs "%Description%"
check the "Package" box and browse for the Set AD Description package. You must set an account to run this task as, the account must have right to modify objects in AD

32. Now you will create a group called Optional Software, this group will hold all the entries for the software options you want in your GUI. For is example I am going to use Firefox, Chrome, 7-zip and VLC. These options should correspond with the software selection list in the GUI. These options are controlled in the below lines of code in the TSGUI.ps1 script.
33. Create a Install Application task even though you can add multiple applications in the task do not do this because each task will run based on the variables set by the GUI. Once you have added the application for the task add the following Options to the task. The variable corresponds with the TSVariable column of the OptionalSoftware variable in the TSGUI.ps1 script.

34. Do this for the rest of the applications you need to have advertised in your GUI. Depending on your software you may want to add a reboot task at the end of this group.

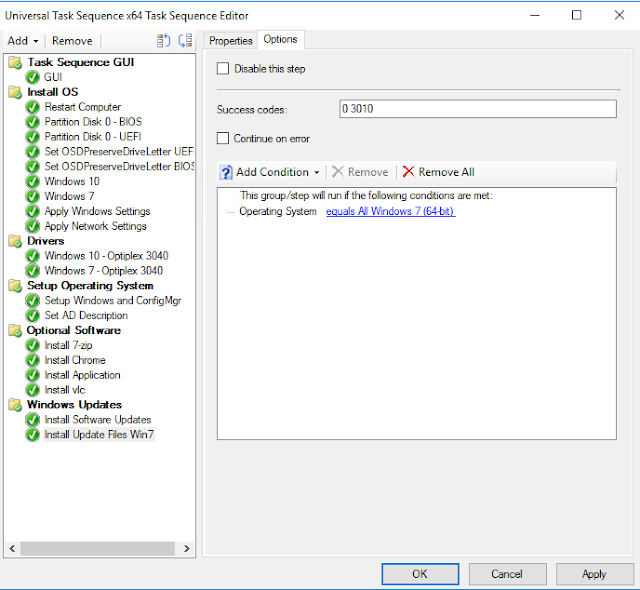
35. Create a group for windows updates, in this group you will add a task to install updates from your server and install any addition update files you need to apply to your image. For the install Software Updates task I leave the settings at there defaults.
Once you have this task completes you will add a run command line task. Name the task Install Update Files Win7 and use the following for the command line
installMSU.bat
in the example files I have included
- KB3172605 – July 2016 update rollup for Windows 7 x64
- KB4019472 – May 2017 update rollup for Windows 10 x64

- Now add a Operating System Version condition to the options tabs and choose All Windows 7 (64-bit)


36. Create a Post Config Group
37. Windows 10 has a lot of addition software that you may not want on your users workstations and IE is some what hidden from a standard user. You can fix some of these issues in your gold image file but I like to keep the image file as untouched as possible. So that is where the Win10Config.ps1 script comes in. This script will remove some of the built in apps based on what is in the AppsToRemove.txt file then will apply a temporary stat menu layout for all new users that log into the workstation. Below is what the Config that comes with the script will look like.

if you want to build your own start menu Config you can make all your changes to the start menu then run the below powershell command.
export-startlayout –path
To make this script run you need to add a run command line task to the Post Config group and use the following as the command line
%SYSTEMROOT%\System32\WindowsPowerShell\v1.0\powershell.exe -NoProfile -WindowStyle Hidden -ExecutionPolicy Bypass -File Win10Config.ps1
check the box for the “Package” and browse for the Windows 10 Config package.

Now add options to the task so it only runs on windows 10

That's it your TS is now complete. If you need a TS for x86 then you can use all the same files but you will want to create a TS GUI package using the files in the TSGUI_x86 folder.


I follow this document but not install applications. So kindly help me
ReplyDeleteProduct Name: System Center Configuration Manager 2016
Version : 1806
I am waiting for your reply Kris Gross
What error are you getting ? Also are your applications able to be installed out side of the TS as in can you push them as a required install or install them form software center ?
Deleteis it possible to add a dropdown for the drivers as well as the OS installs?
ReplyDeletethis would really help me not going through all the 90 different revisions of the same laptop
You could but you would still have to create a task for each driver, If you just want the TS to install the best drivers try to use the "Auto Apply Drivers Task" .
Deletethe content in the link is no longer available.
ReplyDeleteI have updated the links but please use review the updated process posted at the top of the page
DeleteI tried deploy only TSGUI.ps1 and the result is "he operating system reported error 2147942402: The system cannot find the file specified.". Package deployed successfull, TS too. Any suggestions?
ReplyDelete